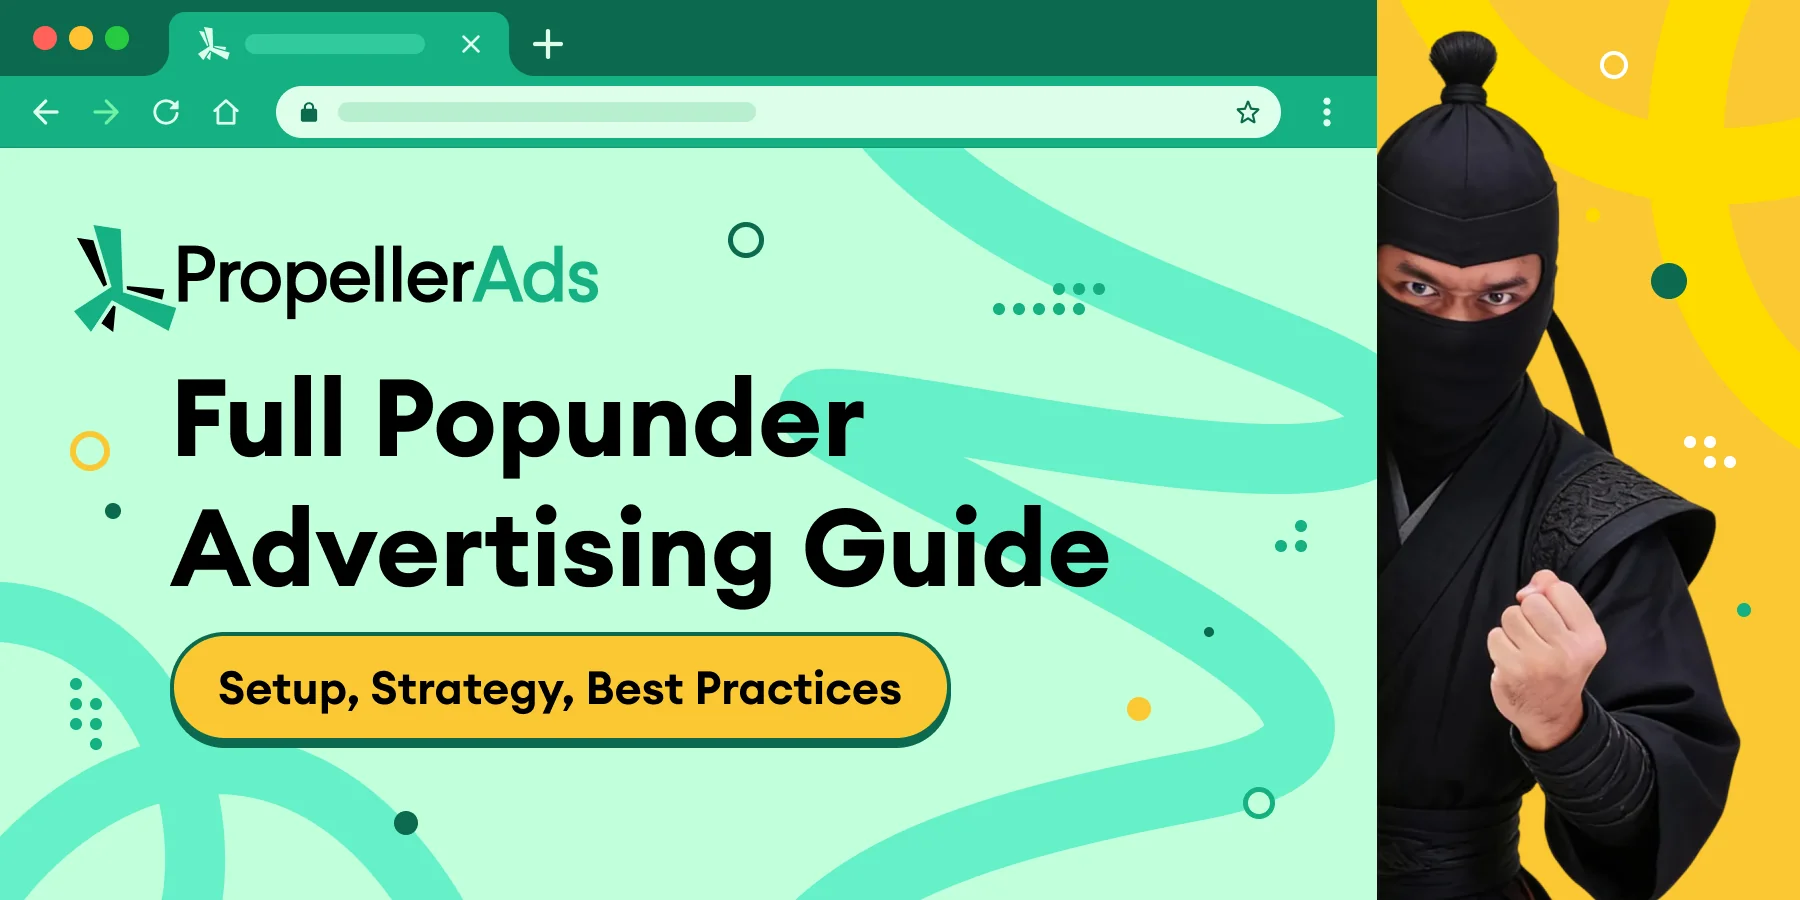
Full Popunder Advertising Guide: Setup, Strategy, and Best Practices
Popunder ads are like vinyl records: every year someone declares them dead, and every year they keep delivering. This evergreen potential of Popunder is easy to explain: on PropellerAds, it’s a high-volume, low-friction format that doesn’t demand creatives, doesn’t rely on banner engagement, and works across a huge range of verticals.
If you want a format that’s beginner-friendly yet scalable for advanced media buyers, Popunder is one of the safest formats to start and one of the easiest to optimize.
In this guide, we’ll cover what Popunder is, why it still performs that good, what makes it different from other “pop” formats, and how to launch a Popunder campaign on PropellerAd, including recommended settings, bidding models, and optimization tactics.
What Is a Popunder Ad?
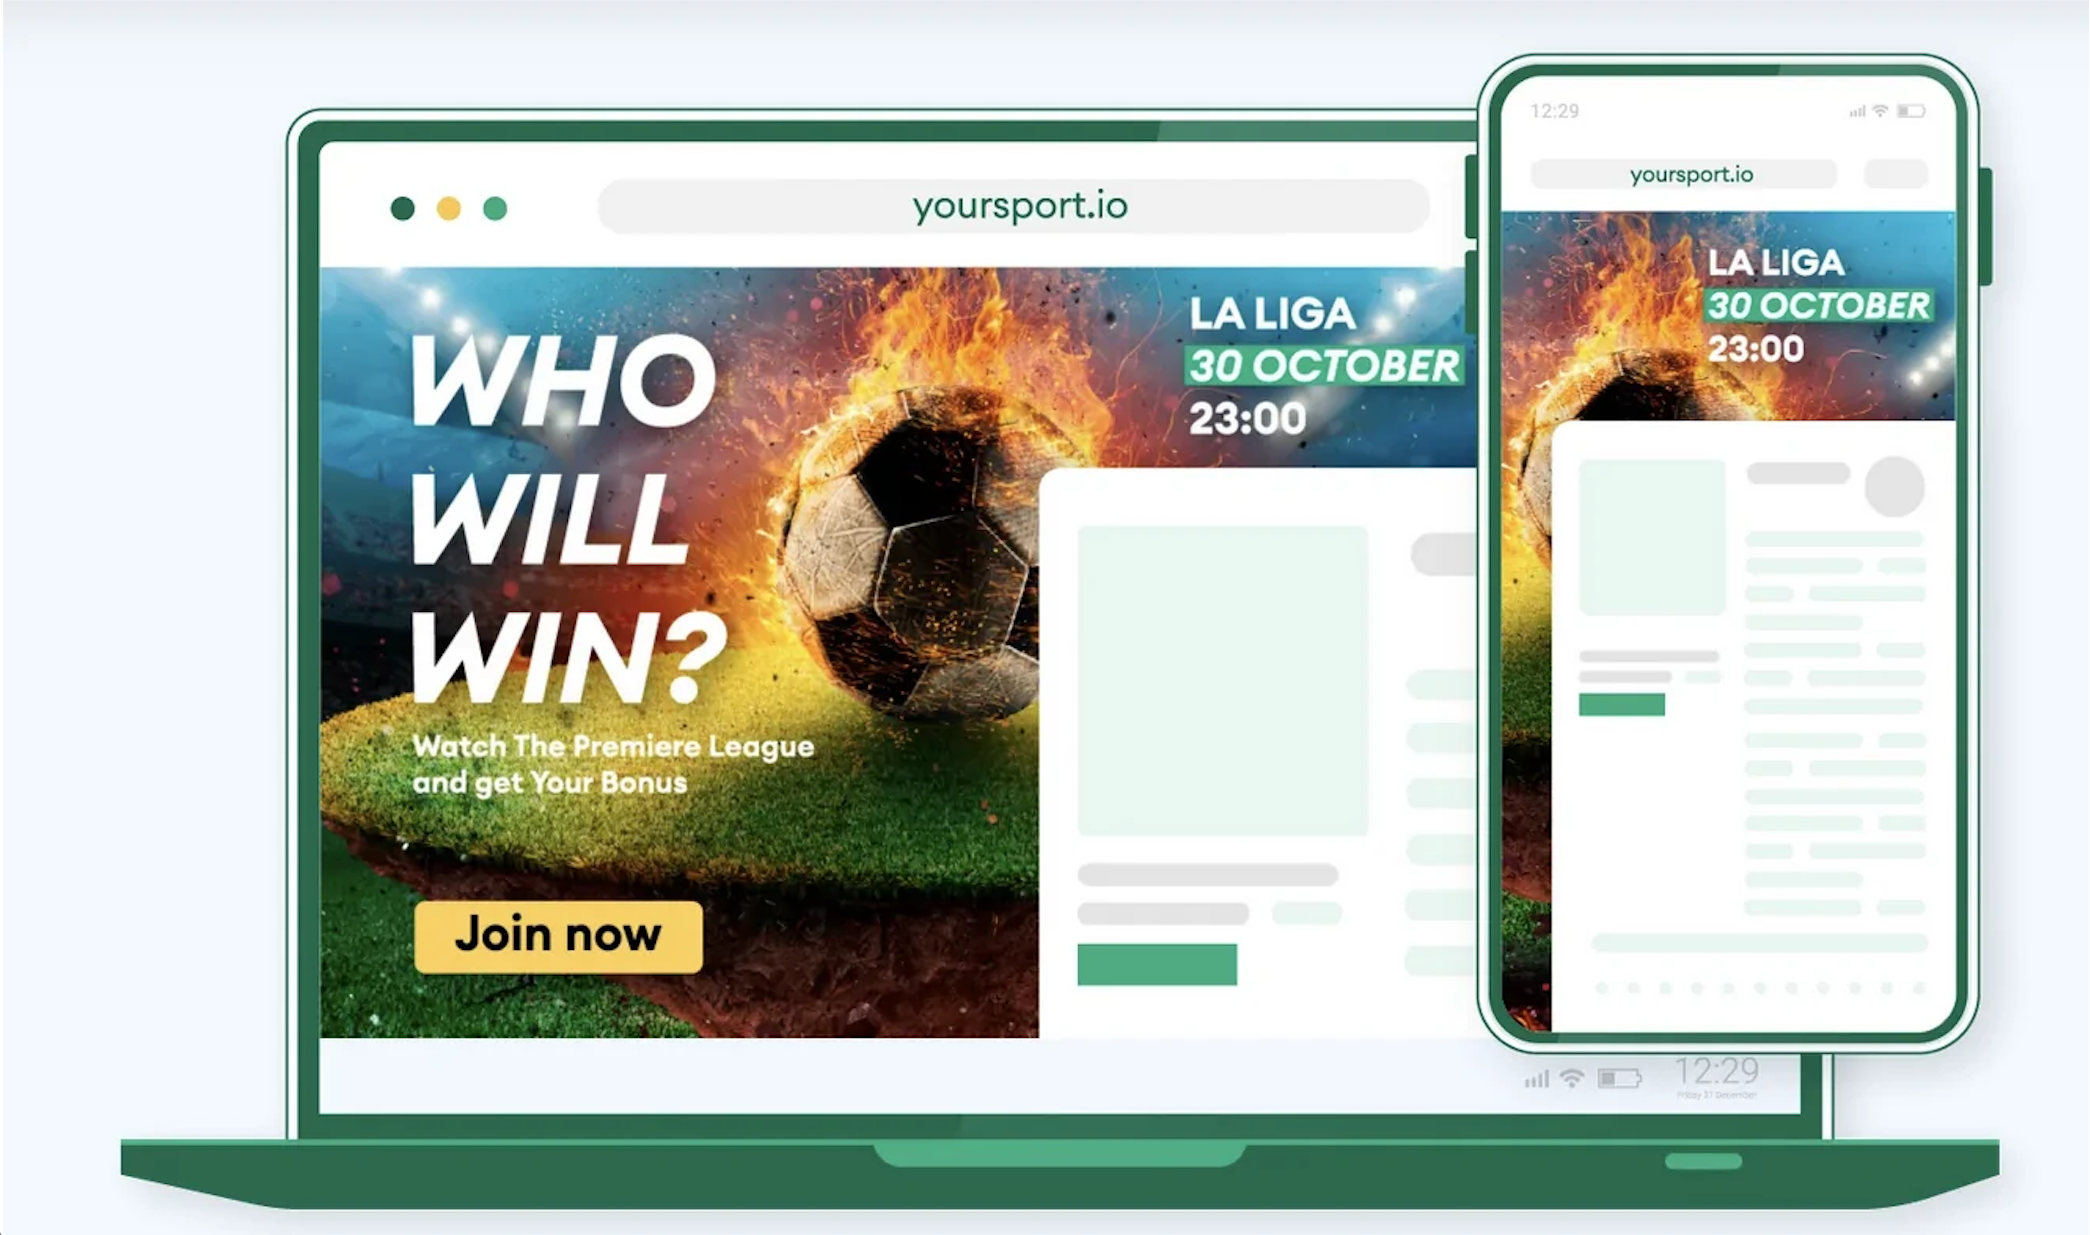
A Popunder ad (also called Onclick, Pop Ads, or Pop traffic) is a full-page ad experience that opens under the user’s current tab after they click on a publisher’s webpage that has pop tags installed.
In practical terms:
- The user is browsing a website
- They click on the page
- Your Target URL opens in a new tab/window behind the active one
- When they close/minimize their current tab, they discover your page
That’s why Popunder can be described as the landing page acting as the ad: you don’t upload banners or texts – you send users directly to your pre-lander or landing page.
Here is what a Popunder ad looks like:
Why Popunder Still Works in 2026
Popunder has stayed strong for a few reasons that don’t really change with trends:
- It has a real potential to beat banner blindness – users don’t ignore a full tab the same way they ignore a banner, especially when scrolling fast.
- It’s beginner-friendly – your funnel and offer do the heavy lifting, so even if you don’t have any experience in making creatives, you are still in the game.
- It’s great for testing and scaling – Popunder is known for being affordable, having predictable mechanics, and delivering significant volumes, which makes it a great tool for testing. Later, once you find converting slices, you can scale systematically.
- It’s compatible with most verticals – from Utilities and Giveaways to iGaming and eCommerce – Popunder is flexible because it’s basically a traffic delivery method.
Popunder vs. Popup: What’s the Difference?
These terms get mixed up a lot, so here’s a quick way to keep them straight:
- Popunder: opens under the current tab (more subtle)
- Popup: opens on top of the current tab (more intrusive)
If you want a more user-friendly “pop” option, Popunder is usually the first pick – it’s noticeable, but doesn’t interrupt the current action as a popup.
How Popunder Traffic Works
So, as we already found out, the Popunder ad is triggered by a click on a publisher page that contains pop tags. When the user clicks, your Target URL opens in a new tab/window behind the current one.
The key takeaway: Popunder isn’t about convincing a user to click an ad creative. It’s about:
- Delivering the user to your page
- And then letting your funnel do its job (load speed, relevance, CTA, pre-lander angle, etc.).
Sounds easy? It is!

Pros and Limitations of Popunder Ads
Popunder is a straightforward format, and it has very specific strengths. Think of it as fast traffic delivery + full control inside your funnel.
Pros, or what Popunder is genuinely great at
- You get data fast: Popunder can deliver volume quickly, which makes it ideal for testing offers, angles, and landing pages without waiting days for statistically meaningful results.
- It’s funnel-first (you control the story): Since users land directly on your page, your results depend less on guesswork and more on LP speed, pre-lander logic, and offer positioning – meaning you can improve performance with clear, measurable tweaks.
- It’s flexible for many campaign goals: Popunder works well for scaling CPA funnels that need volume, building awareness via full-page storytelling, pushing seasonal promos (sports events, holidays, limited-time deals), and collecting audiences for retargeting (when you run it in a broader strategy).
- It’s optimization-friendly: Pop traffic is built for systematic optimization: you can segment by GEO/device/OS/browser/zone/subzone, then whitelist winners and cut spend leaks.
Limitations of Popunder to mind
- Landing page quality is your central creative – and weak pages get punished: Logically, low load, unclear CTA, poor mobile UX, or mismatched language can end up with a quick drop-off. With Popunder, there’s nowhere to hide, so you need to pay special attention to your landing quality.
- User intent is broader than in opt-in formats: You’re not targeting subscribers like Push, so you often need pre-landers (especially in Finance/Social/iGaming) to warm up and qualify traffic.
- Frequency matters more than people expect: Overexposure kills performance quickly, which is especially true with Popunder. This format responds well to conservative capping, especially during the test stage.
Recommended cap for testing: start with 3:24 (3 impressions per user per 24h). If you’re aiming for unique-only exposure, consider 1:336 (once per two weeks).
- Some GEOs and browsers behave differently: Popunder behavior can vary across environments, so you’ll usually see performance differences by browser + OS + device – which is why a clean campaign structure (1 GEO = 1 campaign) helps a lot.
How to Launch a Popunder Campaign on PropellerAds Step-by-Step
Step 1. Create a campaign
In your PropellerAds account, click Create Campaign and choose OnClick (Popunder) as the format.
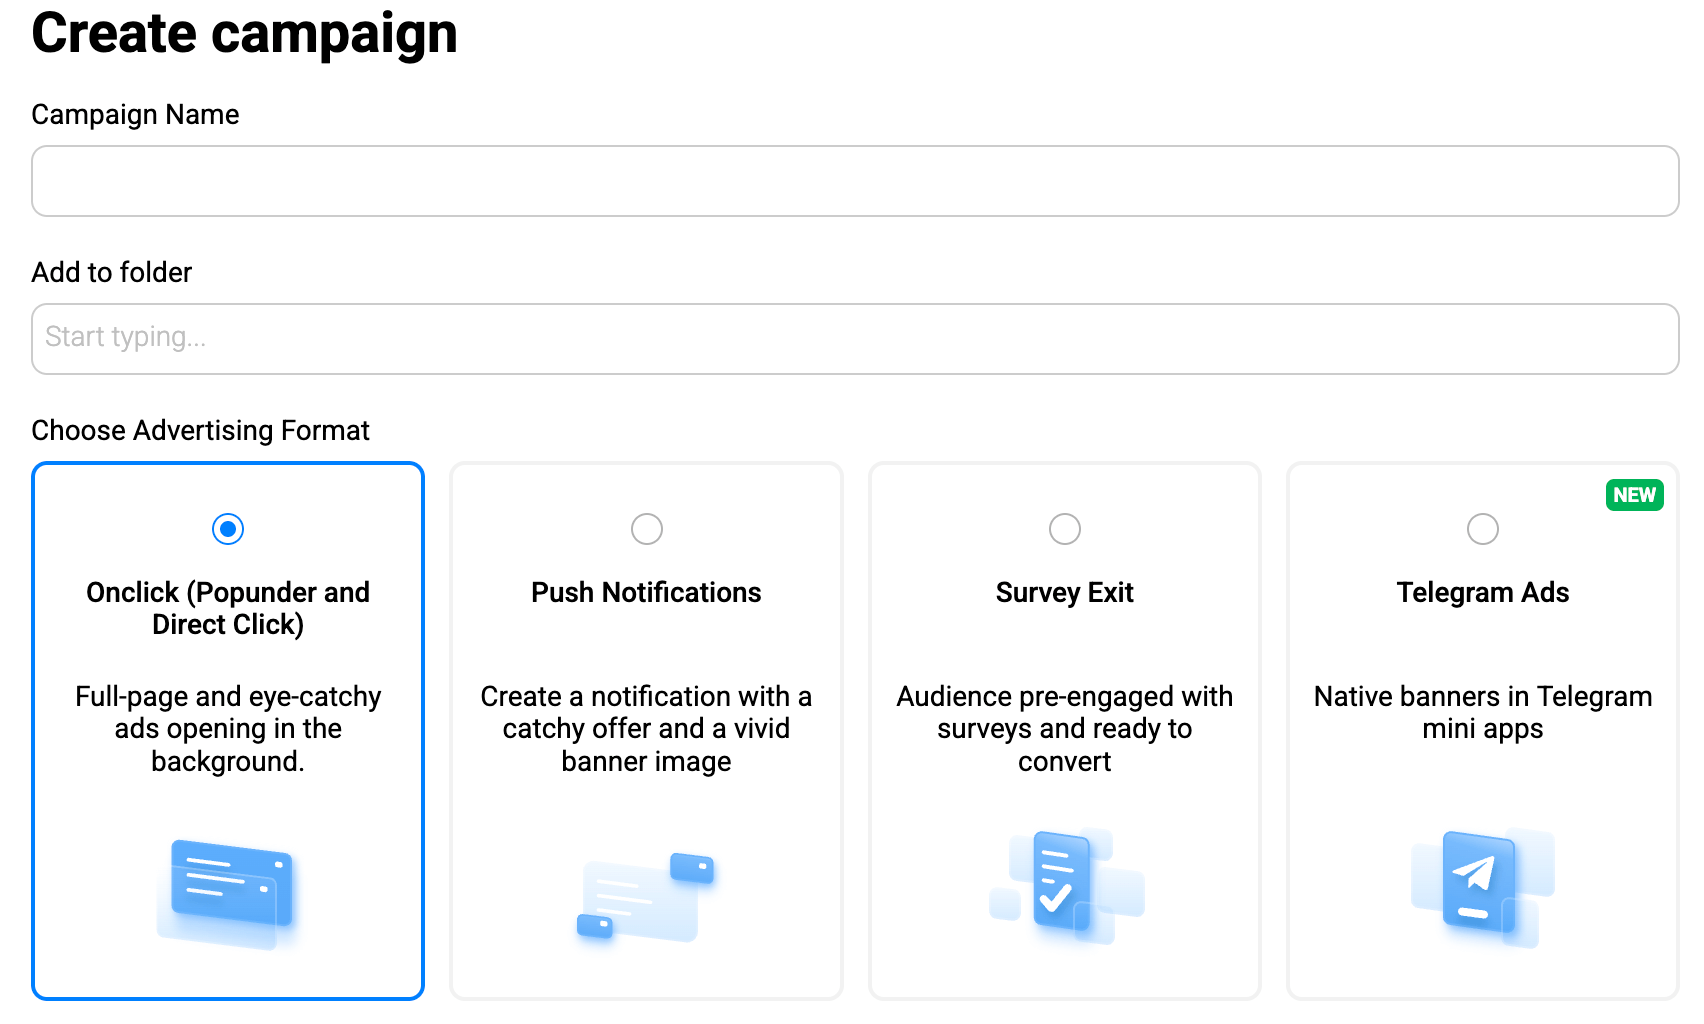
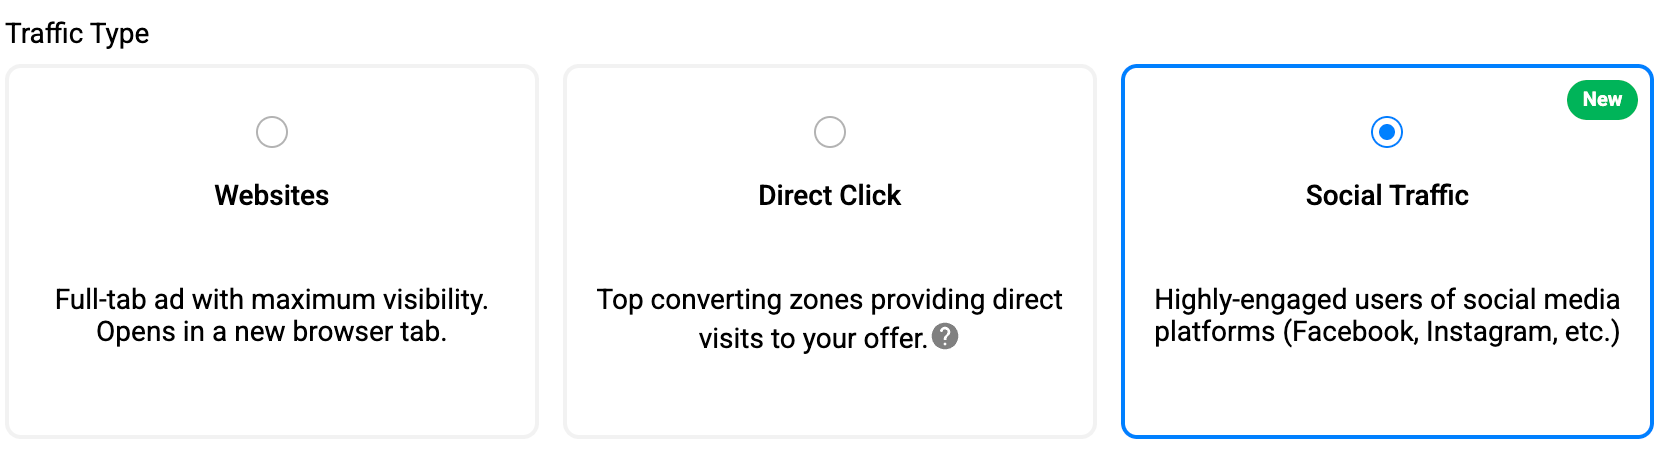
Step 2. Pick traffic type
For specific goals, there are also various traffic types for Popunder: Websites, Social Traffic Type (targeting zones with social-origin traffic), and Direct Click (domain parking traffic and top ad placements selected by our AI algorithms that ensure no-creatives direct visits to your offer).
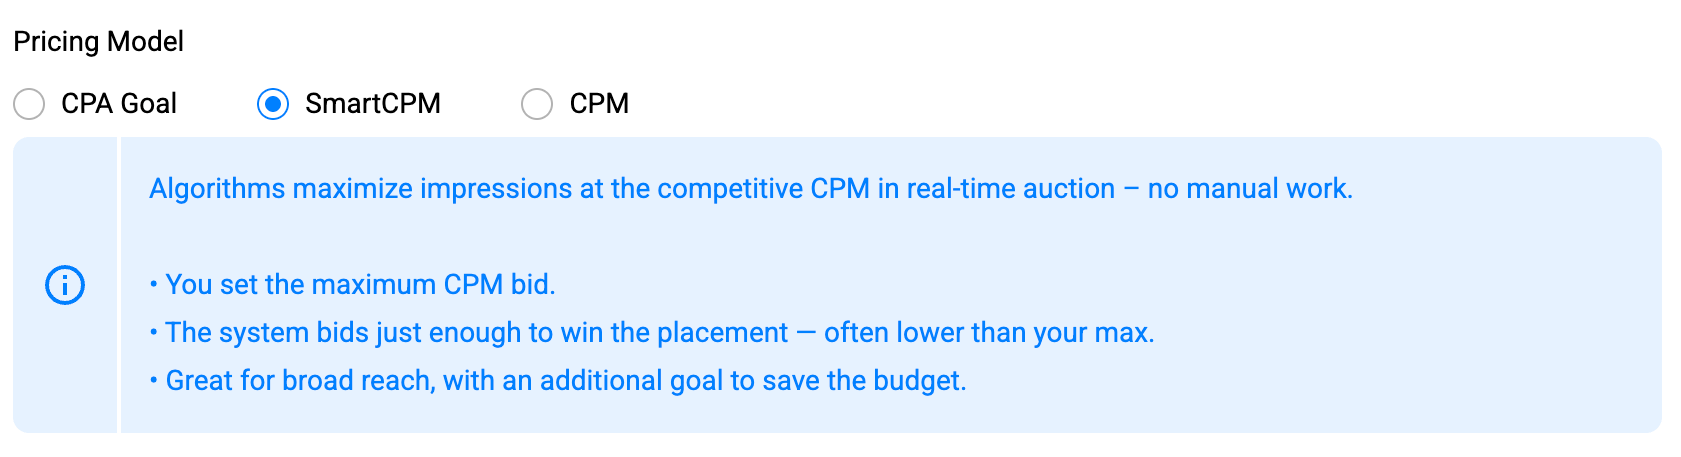
Step 3. Choose your pricing model, aka bidding
On PropellerAds, Popunder campaigns typically use:
CPA Goal: a fully automated model that allows you to run your campaign, aiming at your desired cost per action. The system will optimize traffic sources to meet the budget and reach users most likely to convert.
When to use it: CPA Goal is our most popular model, perfect for newcomers and for those who want to keep their budget under control. Best when:
- You know your payout / target CPA
- You want the system to optimize bids automatically
- You don’t want to micromanage placements early
Practical tip: Set your CPA Goal slightly below your actual acceptable CPA to give the system room (many buyers use a ~15–20% buffer logic, depending on setup and risk tolerance).
SmartCPM: this is an automated model based on the algorithms that maximize impressions at the competitive CPM in a real-time auction. The placed bids are optimal to win the placement – often lower than your max.
When to use it: If your goal is to test and find winning zones. Best when:
- You want a stable bid but still want optimization flexibility
- You want to identify placements for future whitelisting/blacklisting
SmartCPM is often the data collection model that helps you find where performance actually lives.
CPM: In this model, you can manually set fixed bids (which you can change later) and pay per 1000 impressions.
When to use it: If your goal is to scale and get maximum volume. Best when:
- You know how to optimize based on placement data
- You’re ready to whitelist winners and push bids strategically
- You want access to the full traffic potential

Step 4. Add your Target URL (and tracking)
Paste your pre-lander or landing page URL:
If you use a tracker (or plan to run postback tracking), add the PropellerAds macro to your URL so the system can pass a unique click ID into your funnel, like this:
https://www.domain.com/in.php?clickid=${SUBID}
This way, every visit gets its own ID – and when a conversion happens, you can match it back to the right campaign/zone/subzone and optimize based on real conversion data. This is a must if you want to use our most advanced pricing models, like CPA Goal, which works and optimizes campaigns only when you enable conversion tracking (the model needs that data to learn).
Step 5. Traffic sources
Now, you need to choose your desired traffic sources:
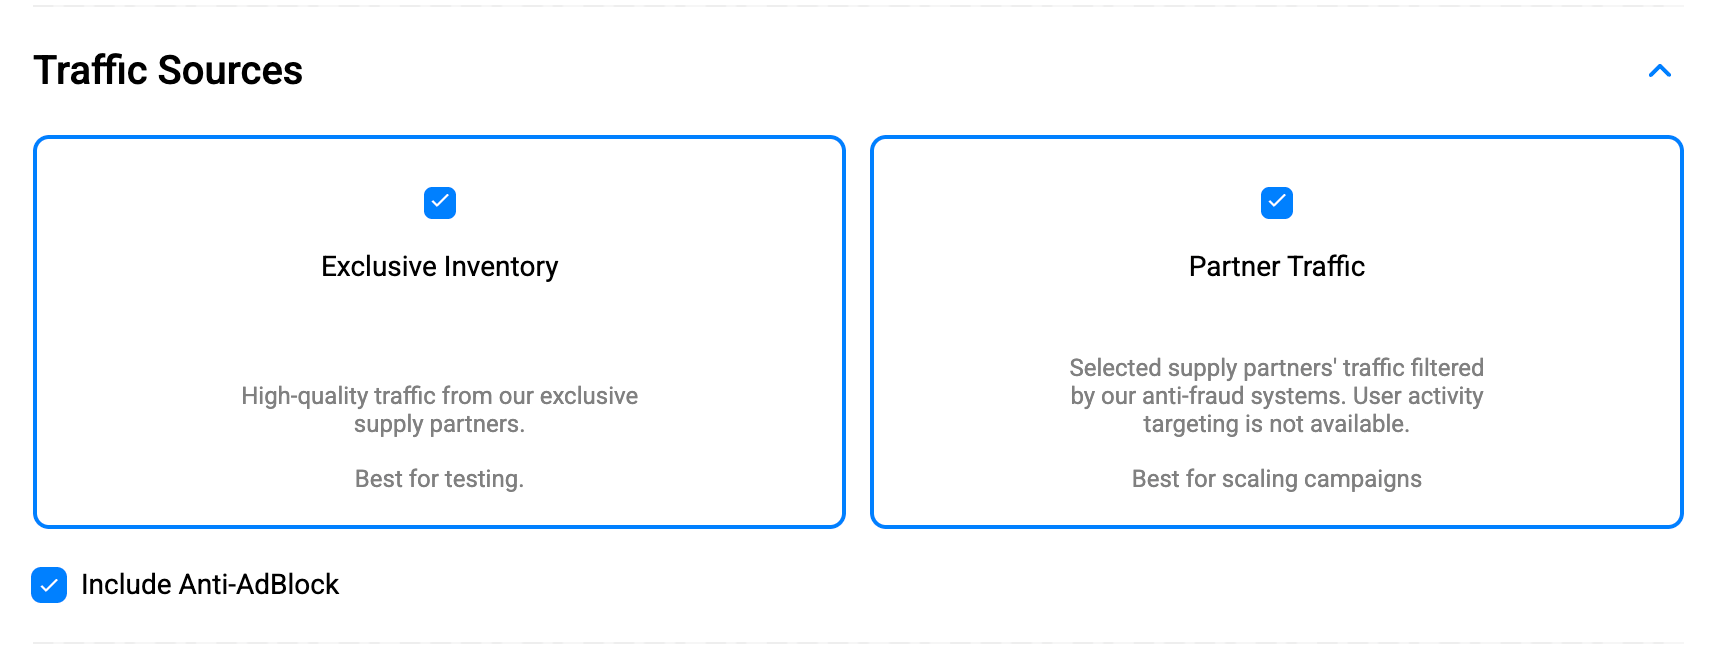
As you can see from the screenshot above, Exclusive Inventory is high-quality traffic that comes from our exclusive supply partners, and it works best for testing and for getting cleaner performance signals early on.
As for the Partner Traffic, it’s an additional volume from selected supply partners, and it is often best for scaling once you’ve found a working funnel.
Recommendation: start with Exclusive Inventory to validate your offer + landing page, then add Partner Traffic when you’re ready to increase reach.
Step 6. Countries and Bids
Alongside evergreen testing logic (start cheaper, move up as you learn), a few markets are currently in strong focus for Popunder campaigns – both in terms of traffic availability and ongoing optimization improvements. If you’re planning new tests, consider prioritizing: US, Germany (DE), France (FR) as standalone campaigns, plus high-volume growth markets like Indonesia (ID), Philippines (PH), Brazil (BR), Mexico (MX), Nigeria (NG), and South Africa (ZA).
In short: these GEOs are hot right now – a good moment to test and capture the opportunity.
If you are running CPM and SmartCPM
In CPM-based campaigns, you set a CPM bid, which is the price per 1,000 impressions.
- Choose the Country (GEO).
- Enter your CPM, $ rate for that GEO.
Because traffic prices vary by GEO, CPM rates can differ dramatically from country to country – that’s expected.
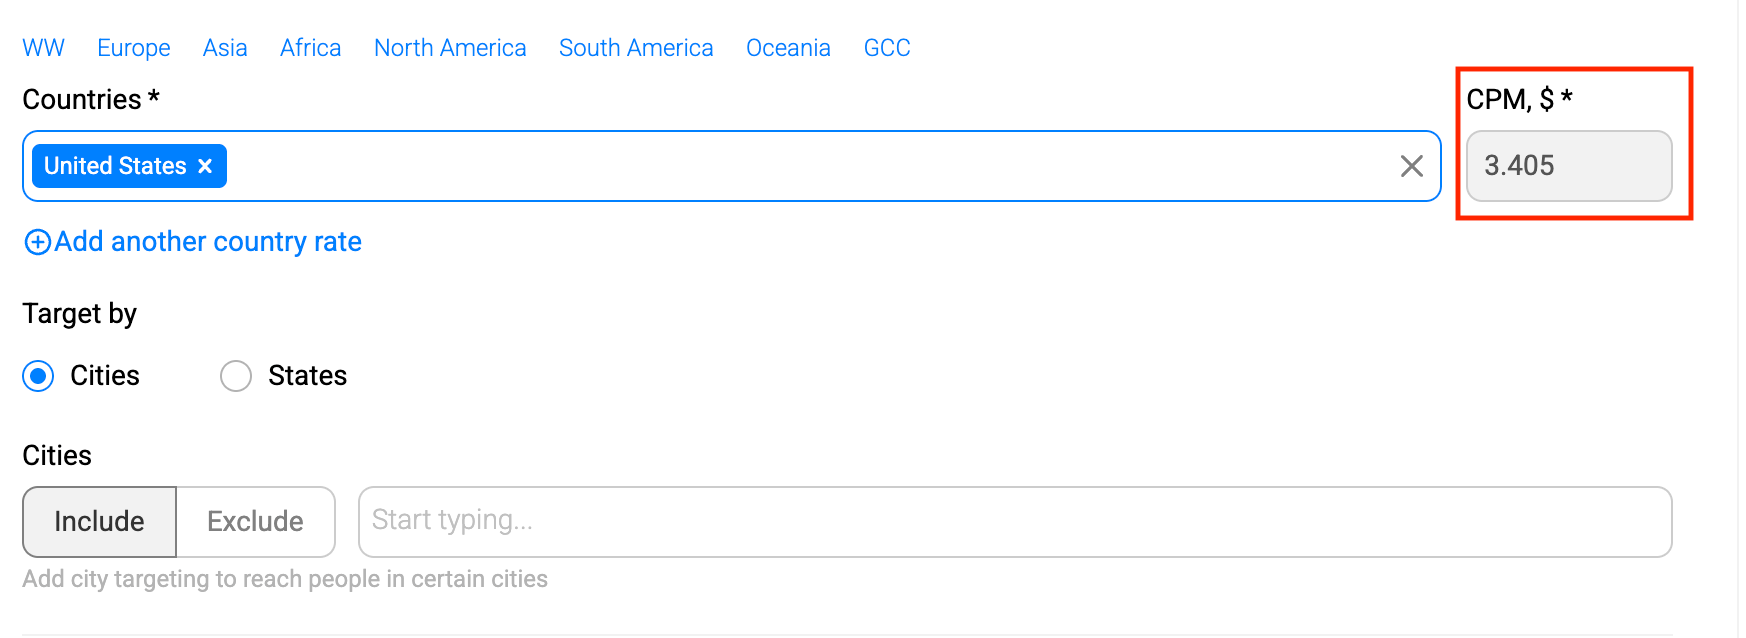
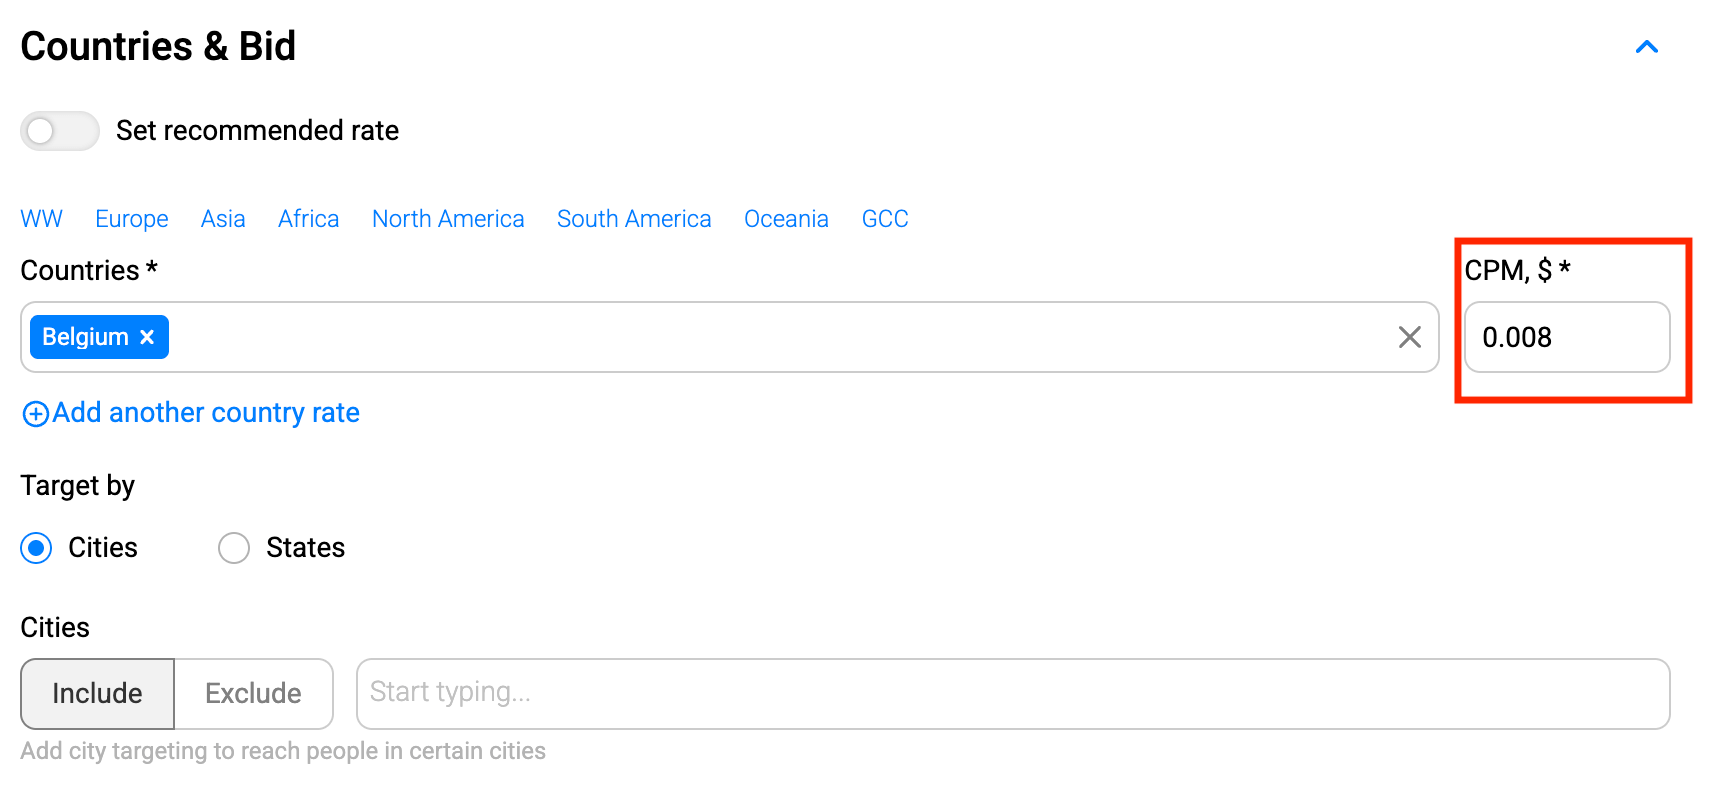
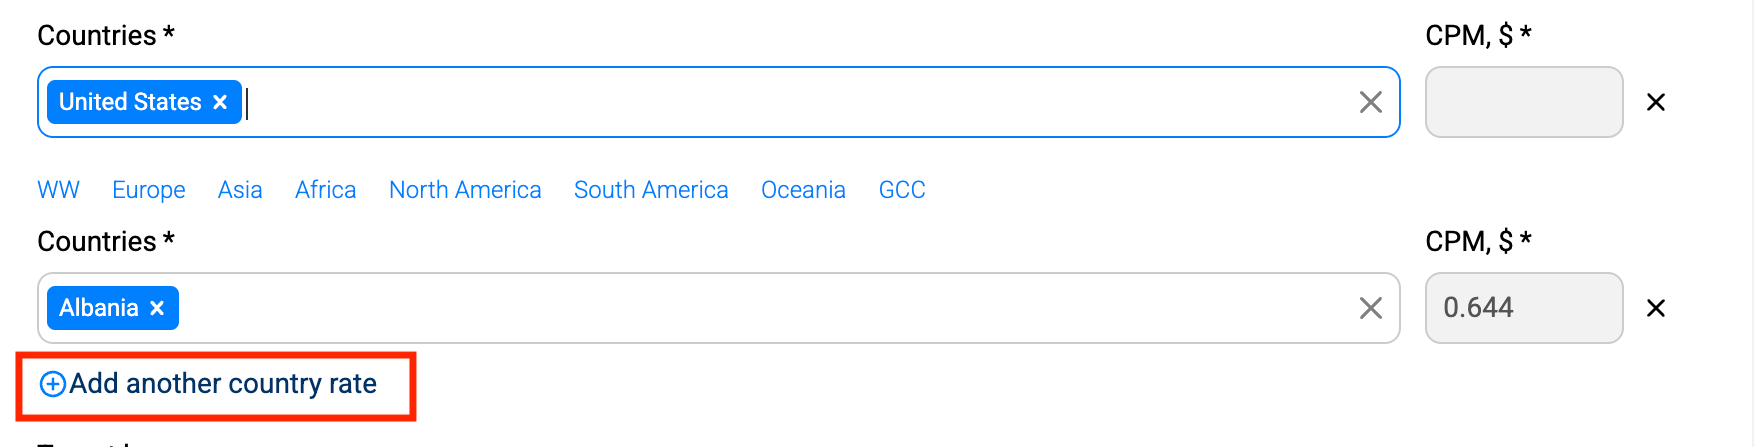
And what if you have multiple GEOs in one campaign? Then you can add another country rate to add more countries and assign a separate CPM bid for each one.
The point is that various GEOs differ in terms of CPM dramatically, which is the main reason why you shouldn’t mix them in one campaign. Remember the golden rule? One GEO = one campaign.
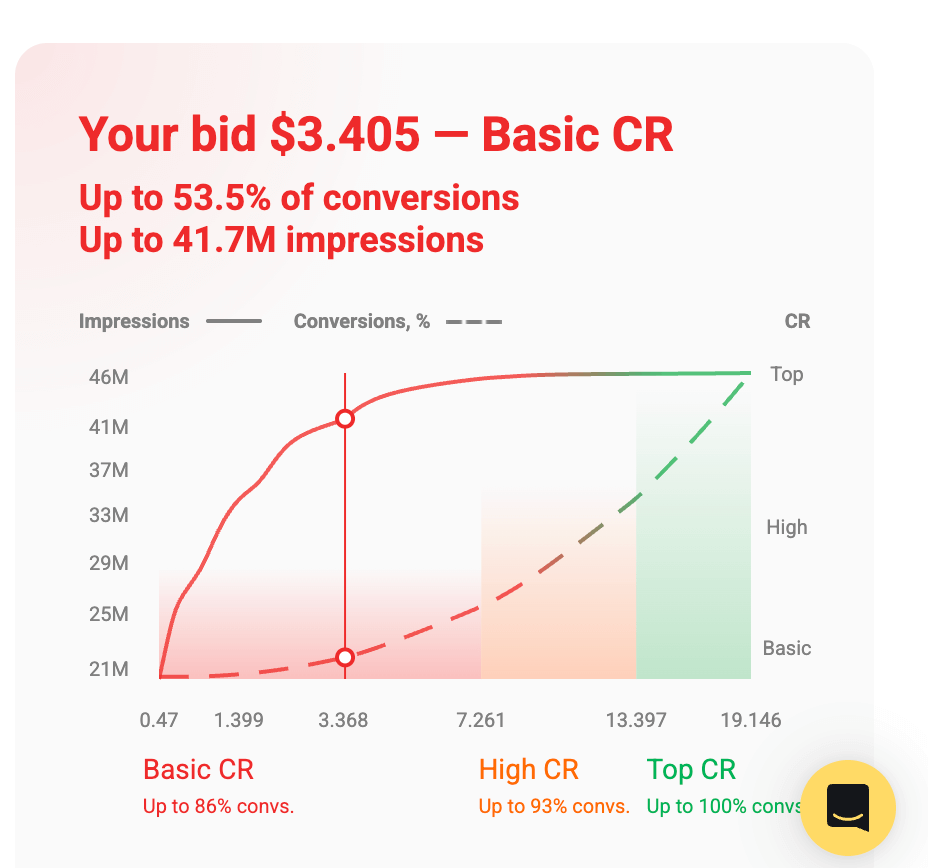
If you’re unsure what bid to start with, toggle Automatic Bidding, andthe platform will auto-suggest a starting CPM for your targeting.

You can also hover over the bid field to see a traffic chart that shows which bid levels are typically competitive in the auction.
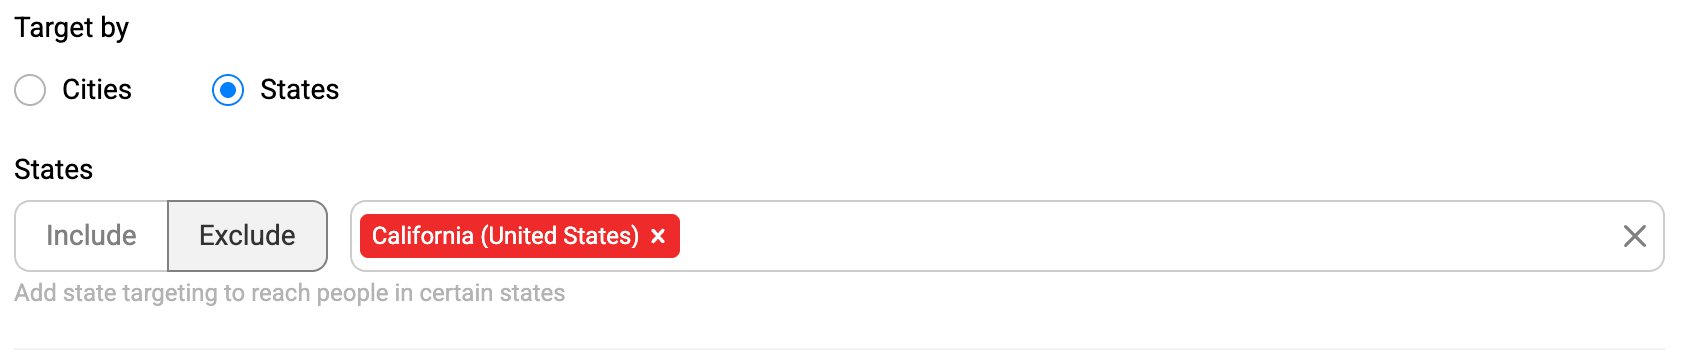
Finally, you can refine location targeting further by including or excluding Cities (and States where available, like in the US).
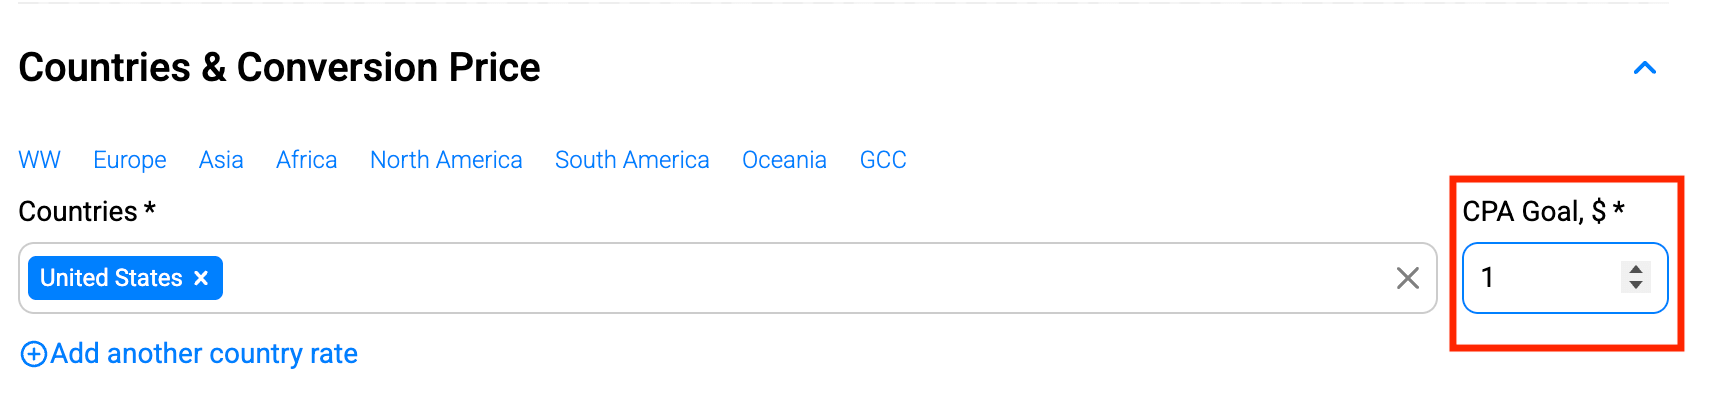
If you’re running CPA Goal
If you choose CPA Goal, the same block switches to Countries and Conversion Price – because you’re no longer setting CPM manually.
- Choose your Country (GEO) (and optionally refine by cities/states where available).
- Set your CPA Goal, $ – the target amount you’re aiming to pay per conversion.
With CPA Goal, the system automatically adjusts bids to achieve conversions around the price you set, making this model a good option when you want a more hands-off optimization workflow.
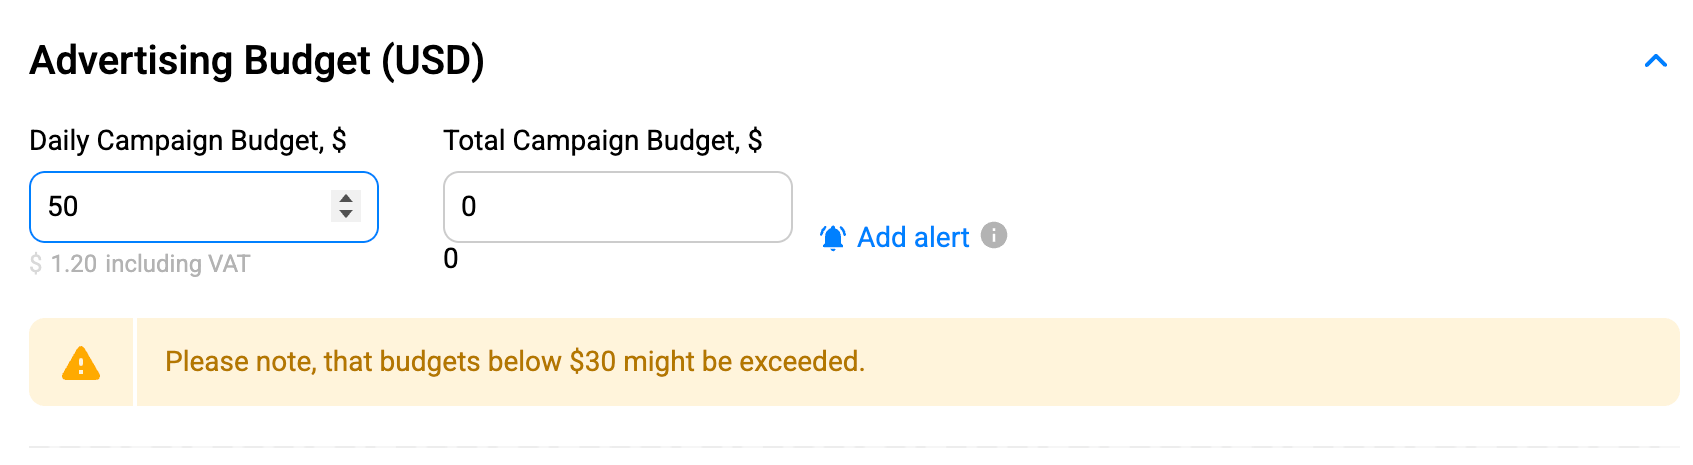
Step 7. Advertising Budget: Daily and Total
In the Advertising Budget, you control how much your campaign is allowed to spend:
- Daily Campaign Budget: the maximum amount your campaign can spend per day. Once the daily budget is reached, the campaign stops delivering for the rest of the day and resumes the next day.
- Total Campaign Budget: the overall spending limit for the campaign. Once the total budget is reached, delivery stops until you increase the limit and restart the campaign.
Important note: If you’re running CPA Goal, the system may spend more intensively during the learning/testing phase while it calibrates bids and finds efficient traffic slices – that’s why very small budgets can sometimes be exceeded.
Step 8. Targeting
Choose the targeting setting for your Popunder campaign:
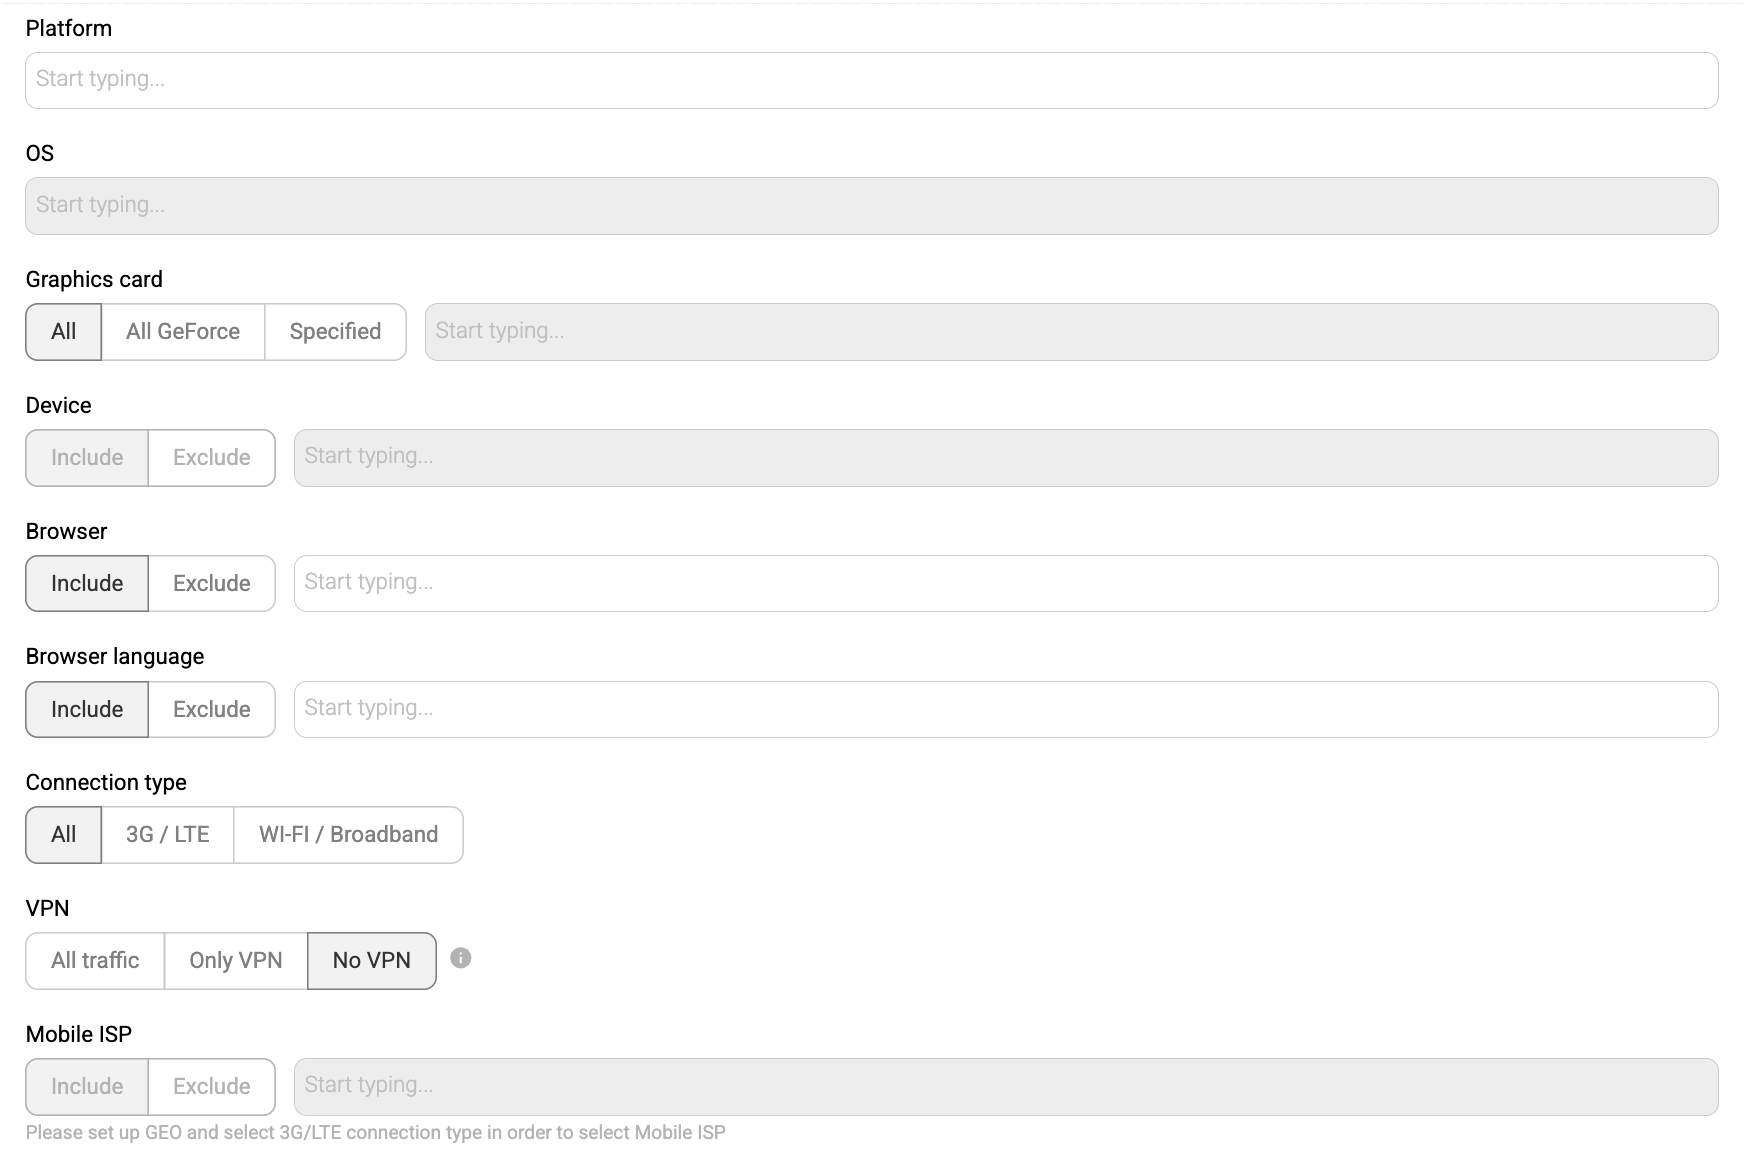
As for the targeting options, here they are:
- Platform: choose mobile, desktop or both
- OS: Android, Blackberry, iOS, Chrome OS, KaiOS, Linux, Windows, and more + choose OS version(s)
- Graphics card: All, All GeForce, or type your variant
- Browser: 30 options, including Google Chrome, Opera and Internet Explorer as well as Facebook browser, Telegram, Instagram, and more
- Browser language: 150+ variants
- Connection type: All, 3G/LTE, wi-fi/Broadband
- VPN: All traffic, Only VPN or no VPN (these are users browsing through private networks or proxy servers)
- Mobile ISP: depends on your GEO

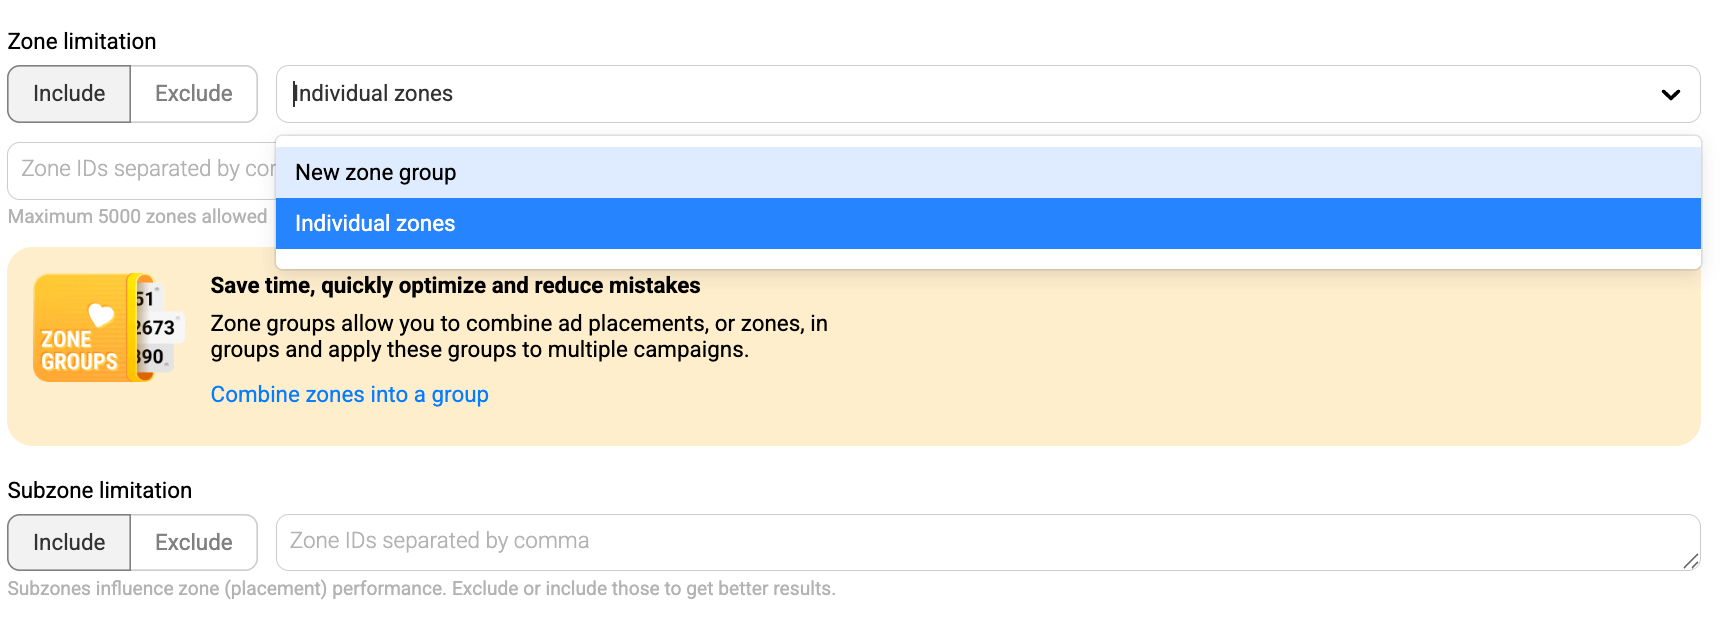
Step 9. Zones, Subzones, Zone Groups
In PropellerAds, a zone is an ad placement (a traffic source) where your Popunder ads can appear – and optimizing Pop campaigns usually comes down to including the zones that convert and excluding the ones that waste budget.
To make this workflow faster, you can use Zone Groups: they let you bundle multiple zones into a reusable list and apply that list to multiple campaigns (and if you update the group, all linked campaigns follow instantly).
If you want even more precision, there are Subzones – smaller traffic segments inside a parent zone. Subzone targeting lets you exclude only the underperforming segment while keeping the rest of the zone running, and it also provides more granular stats for analysis and cleaner optimization decisions.

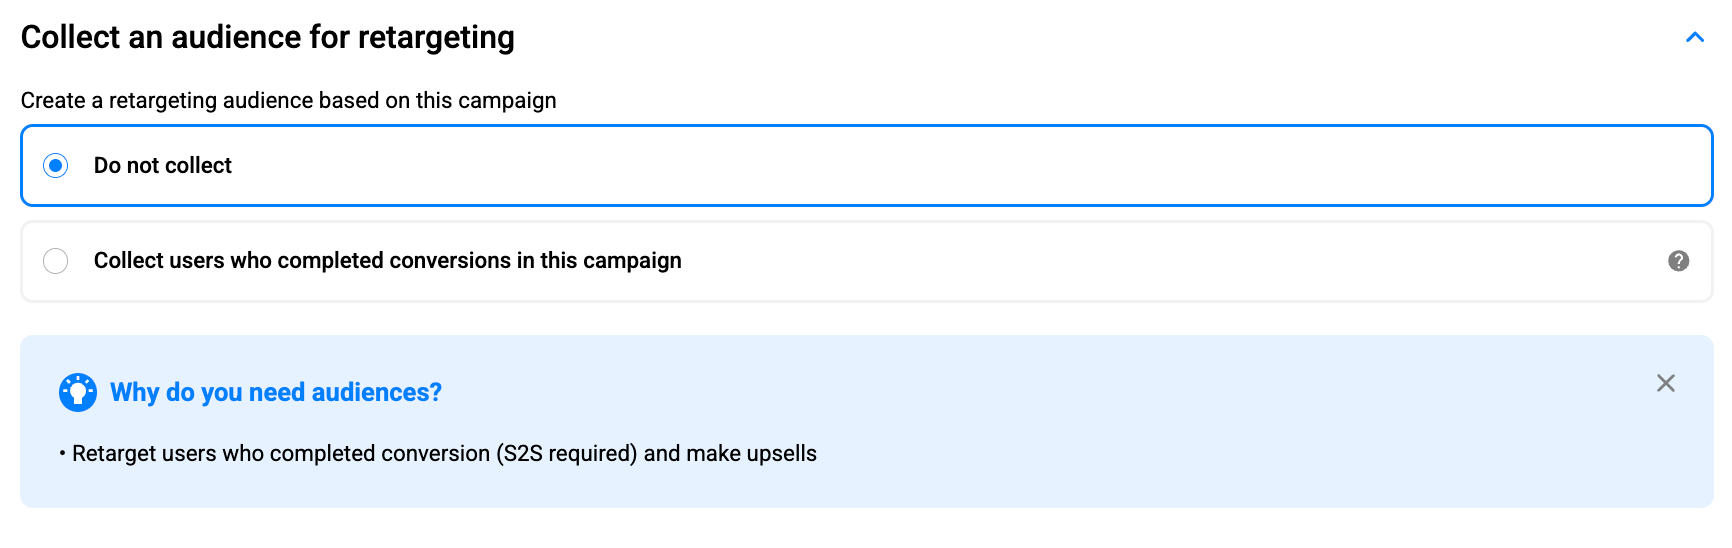
Step 10. Audiences for Retargeting: Optional, but Helpful
Also, you can collect an audience from your Popunder campaign and use it later for retargeting, enabling you to re-engage users who have already shown value to your funnel.
In the Collect an audience for retargeting section, you can either choose Do not collect or enable Collect users who completed conversions in this campaign. This option is especially useful if you want to build a follow-up flow (for example, an upsell or a second-step offer) for people who have already converted.
Note: to collect converted users and retarget them properly, you’ll need S2S postback tracking enabled, since conversions must be recorded by the platform to create this audience.
Our Traffic Experts highly recommend collecting audiences for retargeting, especially when you work with iGaming or eCommerce.
Landing Pages and Pre-landers: What Actually Matters
With Popunder, your landing page is the main ad experience – users don’t fall for a banner or a headline first. Instead, they land straight on your page in a new tab, so whatever happens next depends almost entirely on your funnel. That’s why Popunder can feel brutally honest: if the page is slow, confusing, or mismatched with the user’s expectations, you’ll see it in the numbers almost immediately.
Landing page must-haves
- Fast loading (slow pages can decrease your conversion rate significantly)
- Clear CTA above the fold
- Mobile-first layout if you’re running mobile
- Localization (language + currency + culturally familiar visuals)
When to use a pre-lander
Pre-landers come in when you need a bit more control over who reaches the offer page and how they arrive there. They’re great for warming users up with the right angle, filtering out low-intent clicks, or adding clarity when the offer is complex or sensitive.
That’s why you’ll see pre-landers used a lot in Finance, Social, and iGaming funnels, where cold traffic often needs context before it converts.
Popunder Launch Recommendations from PropellerAds Traffic Experts
Popunder is one of the fastest formats to understand what’s going on in a new offer, because it delivers volume quickly and gives you enough data to start optimizing early. The smartest way to launch isn’t to over-target from day one – it’s to run a short learning phase, read the signal, and then build a clean structure around what converts.
Start with a short RON (Run Of Network) phase, then build a whitelist
At launch, go broad (RON) long enough to collect placement data, then move into control mode:
- Track the basics from the start (spend, CPM/CPC, CTR, CVR, CPA, profit).
- After a short RON learning phase, build a zone whitelist (and keep pruning losers).
This “broad > whitelist” approach is the most repeatable way to turn Popunder volume into stable performance.
Use frequency caps and scheduling to protect the conversion rate (CR)
Popunder can burn out quickly if you overexpose users. Our experts point to freq-capping + dayparting as CR protection tools.
For Giveaways specifically, the checklist suggests starting around ~1 impression per 24h on Popunder during RON, then adjusting once you’ve identified quality zones.
Test at least two pricing models before scaling
Before you decide if the offer works, our experts recommend testing at least two models (the common Popunder pair is):
- SmartCPM (or CPM) to map zones and find where performance lives during RON
- CPA Goal: once you have stable conversion tracking (S2S postback) and a set of winners
A practical pattern across all verticals is:
- Start broad on SmartCPM/CPM > learn zones
- Move winners to CPA Goal > stabilize CPA and scale
Scale the winners and don’t just increase the budget
Once you have converting zones/slices:
- Scale by whitelisting and raising bids on winners (instead of pushing budget into everything).
- Add layers only after the core works (additional formats, additional traffic sources, or higher-intent traffic types like Direct Click).

Vertical-specific Popunder Playbook
iGaming
Our experts recommend using Popunder as the first step to collect data fast, then layering additional formats later (Classic Push + In-Page Push). Launch logic is the following:
- Start broad on SmartCPM/CPM to map zones > then switch winning segments into CPA Goal
- Funnels that often work better: interactive pre-landers (quiz or mini-game), local language, minimal steps to registration/FTD
- Scale around events (sports peaks), and use dayparting + GEO-splitting (state/city) where it makes sense

Giveaways
Also, here are two dependable starts for a Popunder Giveaway campaign:
- Start with Popunder + SmartCPM on RON, freq-cap ~1/24h
- Raise bids gradually to unlock better zones > build a whitelist
- Move to CPA Goal once S2S postback is implemented
Optimization note: Cut aggressively by early signals during RON, then judge whitelisted traffic by cost-to-payout logic.

Utilities
Your Utilities guidance is:
- Strong mix: OnClick + Push with CPA Goal, but also test SmartCPM (sometimes, it brings cheaper installs, so you should check)
- Structure matters: split by GEO, language, connection type (Wi-Fi vs 3G), and browser – CPA can vary massively by slice
- Pre-landers are not a given: A/B test pre-lander vs direct flows
- Bid tactic: consider starting with a slightly higher CPA Goal to earn better evaluation/volume, then optimize down
- Extra scaling lever: test Direct Click for higher-intent traffic once the funnel works
eCommerce
For eCommerce, there is a simple algorithm you should try:
- Start with SmartCPM to learn supply and placement behavior
- Widen first (collect data), then prune by zone performance and iterate creatives/funnel steadily
Final Thoughts
Popunder is a powerful tool in your advertising arsenal. It doesn’t rely on creative tricks or constant visual refreshes only, but it relies on volume, clarity, and funnels that engage users. When set up correctly, Popunder gives you fast data, predictable mechanics, and enough scale to test, optimize, and grow with confidence.
Start broad, let the data come in, build whitelists, protect your frequency, and improve what users actually see after the click – your landing page or pre-lander. Whether you’re just launching your first campaign or using Popunder as a data engine for a multi-format strategy, the fundamentals stay the same.
If you give Popunder a clean structure and the time it needs to learn, it will quietly do what it has always done best: deliver traffic, reveal what converts, and support sustainable growth.
Launch your Popunder campaign with PropellerAds today and see!
Join our Telegram for more insights and share your ideas with fellow-affiliates!
Trends
View more posts